Friday, May 31, 2013

Sugar Cookies

I forgot how fun these cookies were to make. Alivia and I decided to do some baking one Sunday afternoon and because these cookies involve just a little more work than adding and mixing ingredients I knew she would love them. First we mixed together the ingredients and then...
 
we rolled the dough into balls and smashed them flat....
 
and then we added sprinkles until some of the cookies couldn't hold anymore.
 
 The best part was that these cookies tasted delicious (always important if you are going to spend a Sunday afternoon baking).
 
Ingredients
1/4 c. powdered sugar
1/4 c. granulated sugar
1 tsp. baking soda
1 tsp. salt
1 tsp. cream of tartar
1 c. margarine
1 c. vegetable oil
2 eggs
1 tsp. vanilla
4 c. + 1 T. flour
 
Instructions
Mix by hand all ingredients. Roll into small balls. Press each ball with glass dipped in sugar. Bake at 375 degrees for 8 to 10 minutes.
 
Note: Less flour is best. May substitute butter for margarine. Butter is a crispier cookie. Margarine makes a slightly softer cookie.


Wednesday, May 29, 2013

Why Quiet Is Not Necessarily a Good Thing

I just wanted to warn everyone that the really cheap books at Target (this was a Disney princess book for about $3) just might have a set of stickers on the inside cover (I guess that makes it an even better deal). I thought Liv was quietly reading a book but instead found her like this. Her excuse? She didn't have any paper! 


Follow my blog with Bloglovin

Monday, May 27, 2013

Planting Flowers

For Mother's Day we gave all of Alivia and Bennett's Grandma's this flower pot that I had made. Of course every flower pot needs flowers. So we stopped at our local flower shop on the way home from work and school. That afternoon we turned the kid's picnic table into a planting station and repotted the flowers we had purchased into bigger pots that fit into the flower pots I had made. We had a lot of fun and made a pretty good mess. But the best thing about working outside is that big messes clean up really easy (just add water).


 photo FightAgainstBoredomSignature2_zpsc09e8e8d.png

Friday, May 24, 2013

Foam Sticker Stamps

 Over the years we have somehow managed to collect several inkpads (thanks to my mom) but have somehow lost all of our stamps. I am hoping the place I put them so I wouldn't forget will magically reappear when we move at the end of the year. But have no fear those inkpads will not go to waste after stumbling upon this genius idea. I wish I would have thought of this earlier since the kids had such a great time stamping away prior to lunch.


What You Need

Foam Stickers
Plastic Bottle Lids
Inkpad
Paper 

What To Do

1. Place foam stickers onto the top of your bottle lids (I feel silly typing these instructions since this is so easy...oh well).

2. Stamp away as pictured here....


and here...


(Liv's Polka Dot Stamp that I thought was awesome!)

I hope everyone has a safe Memorial Day weekend. We are planning to do a little camping. Hopefully it will stay warm for us!


 photo FightAgainstBoredomSignature2_zpsc09e8e8d.png

Wednesday, May 22, 2013

Hurry Up Summer!

I was browsing through my pictures and came across this one from last summer. Today was the last day of school for the kids in our community and it was only 55 degrees and raining! Definitely not the way to start summer vacation. I am sure I will be complaining in a month once the weather is hot and humid and being outdoors becomes miserable. But at least there is always relief from the heat at the pool or in the front yard.


Hurry up summer! We are ready for you!

Monday, May 20, 2013

Modge Podge Photo Collage Flower Pot

I am so happy with how these flower pots turned out. The best part was that they were easy to make and inexpensive. Most of the supplies I already had on hand and the terra cotta pots were purchased from the dollar store for $1.50 each. This project was time consuming (1 1/2 hours spent putting together each pot) but I split out the steps over the course of two nights once the kids were in bed. Add a bottle of wine and this was one relaxing project!


What You Need

Terra Cotta Flower Pot
White Acrylic Paint
Favorite Photos printed in black and white on printer paper
Modge Podge
Foam Brush
Scissors
Acrylic Sealer (in the craft section typically by the modge podge)

What To Do

1. Paint the flower pot with the white paint using a foam brush. This may involve several coats of paint (make sure pot dries completely after each coat).


2. Trim down your pictures as pictured below. I printed nine pictures to each sheet of printer paper. As I glued each picture to the pot I trimmed the pictures down further.

 
3. Using Modge Podge and a foam brush paint the back of each picture and adhere to the flower pot.

4.  Once each picture has been glued to the pot paint a layer of Modge Podge over the entire flower pot. This will protect your pictures, paint, and give your pot a glossy look.

5. Once the flower pot has dried spray an acrylic sealer to help eliminate any tackiness.


We picked up small containers of flowers at our local grocery store to place into the pots before gifting.  Everyone loved their flower pots and the best compliment was when everyone asked where I had bought them from (I fooled them!). So if you have a little time and you are looking for a personalized inexpensive gift I would definitely recommend giving this project a try. I am sure you will be happy you did!


 photo FightAgainstBoredomSignature2_zpsc09e8e8d.png

Friday, May 17, 2013

Taco Rolls

This simple recipe came from my mom. I love how easy it is and how each person can dress up their "tacos" however they please. I like mine with a little salsa, sour cream, and black olives. My kids like theirs with cheese on top.  I once made this for an afternoon candle party I hosted and it was a big hit with my guests.


Ingredients
2 packages of cresent rolls
1 lb. hamburger
1/2 c. shredded cheddar cheese
1 package taco seasoning
Taco Toppings (lettuce, tomato, black olives, salsa, sour cream, etc.)

Directions.

1. Preheat oven according to cresent package directions.

2. Brown hamburger and drain. Return to pan and add taco seasoning. Cook according to taco seasoning package directions.

3. Add shredded cheddar cheese to hamburger mixture and set aside.

3. Open cresent packages and lay on cookie sheet as pictured.

4. Place 1-2 spoonfuls of the hamburger mixture in each cresent as pictured above. Fold the cresent dough over meat mixture and tuck under forming a wrap/roll.
5. Place in oven and bake according to cresent package directions.
6. Top with your favorite taco toppings and enjoy!


I usually serve this with a side of spanish rice. This is a quick and easy meal and does not usually last long in my house. I am definitely all about quick and easy this time of the year because the faster I can get dinner on the table the faster we can get outside to play!

 photo FightAgainstBoredomSignature2_zpsc09e8e8d.png

Wednesday, May 15, 2013

Superhero Cuffs

Do you have a superhero in your home? I have two. They jump from chairs, steps, boxes, and anything they can climb onto. So when I was trying to come up with a craft for the two of them I thought this would be perfect. It was easy, kept them busy painting while I made dinner, and was a great accessory in their fight against crime after their tummies were full.


What You Need

Cardboard Tube (Paper towel held its form the best)
Paint
Glue
Scissors
Stickers
Markers
Paper

What To Do

1) Cut the cardboard tube down one side. Then cut into 2" or 3" sections (pictured). You now have your superhero cuffs that are ready to be decorated.


2) Paint the cuffs your favorite color.

3) Accessorize using paper, markers, stickers, colors, glitter, or anything representing your super hero powers.

4) Squeeze the cuff back into shape.

5) Fight the bad guys, save the hostages, and avoid the emergency room.

Have Fun!

(The best picture I could get while in use....come on now Superhero's do not have time for photos!)


 photo FightAgainstBoredomSignature2_zpsc09e8e8d.png

Tuesday, May 14, 2013

Happy 30th Birthday To Me!

Well it is official! I am leaving my twenties behind and excited for what the thirties will bring. I would be lying if I said I was excited to be turning 30 but I am going to embrace it! It is crazy to think just how much can happen in your life in one decade. I thought it would be fun to put together 30 life experiences to commemorate those wonderful years.

In my twenties I....
1. Traveled to Ireland, Hawaii, Chicago, Las Vegas, Washington DC, and Colorado.
2. Graduated from college with a Bachelors in Accounting.
3. Graduated with my Masters in Accounting (that was definitely a drawn out process).
4. Held my first fulltime job.
5. Moved back to my hometown (and commuted two hours a day to keep my first time full time job for 2 years).
6. Married the love of my life after 7 years of dating (in beautiful Maui).
7. Switched to a local Accounting Firm and ended my two hour a day commute.
8. Bought my first car....and paid for it!
9. Passed the CPA exam!
10. Became a mother (twice). This was by far two of my greatest accomplishments.
11. Bought a farm (holy debt!).
12. Attended the weddings of great friends and family members.
13. Paid off those darn student loans.
14.  Bought a house.
15. Went to some really fun concerts (Tim McGraw & Faith Hill, Justin Timberlake, Brad Paisley, Black Eyed Peas....to name a few).
16. Went to a casino and walked out with $14 extra in my pocket.
17. Had a go making handmade mobiles on Etsy (wow that is a lot of work!).
18. Lost my wonderful Grandpa (but forever thankful for the time I had with him).
19. Made new friends who have made me who I am today.
20. Tried Mexican food for the first time...and liked it.
21. Read some of my favorite books (Gone With the Wind, Pride & Prejudice, Hunger Games (ha ha)).
22. Went undefeated in a volleyball league (by undefeated I mean didn't win a single game).
23. Had a go at another volleyball league and won one game!
24. Had many vehicle mishaps. As in being stranded with several flat tires, having deer run into me in  3 separate incidents (they hit me because I did not hit them on purpose), losing a wheel once exiting the interstate (scary...make sure those lugnuts are on tight), backing into a tree (the day of my baby shower mind you), and locking my keys in my car (far to many times to count).
25. Thought about running a 5k...maybe I will actually do this in my thirties!
26.  Became a camera junky (I still cannot operate a camera properly but I do take way to many poor photos).
27. Realized just how important my family is (without them my life would be much harder).
28. Realized how lucky I am to have what I have.
29. Embraced myself for who I am (freckled pale skin and all).
30. Save the best for last? Hmm....all of the above!

After reading the above list I must say it makes me feel much better about leaving my twenties behind. I am excited to see what this next decade has in store (even if my twenties are going to be hard to beat).

 photo FightAgainstBoredomSignature2_zpsc09e8e8d.png

Monday, May 13, 2013

House Progress

This house update is long overdue. Our spring has been wet so the building process has been slow. I am happy to report that our basement has been formed and poured. It is exciting to see things take shape and it is hard to believe that this time next year we will be living in this bad boy. So here is hoping framing will start in the next couple of weeks.
 
 
(Basement Walkout)
 
(Back of the house)
 
(Best part of building is all of the dirt!)

We have lived on this property for almost 7 years in a 90 year old 1,025 square foot home. I love our house but due to its age and size building a new home was our best option. So for the next year our backyard is going to be every little boys dream. Filled with dirt as far as the eye can see and really cool trucks. Bennett (and even Liv) are having a blast getting dirty by day and soaking in the tub by night.


 photo FightAgainstBoredomSignature2_zpsc09e8e8d.png

Friday, May 10, 2013

Cotton Swab Flower

This craft is proof that a flower can be made out of anything. We have had so much rain this spring that I am really hoping we can start doing some crafts with the real thing. For now cotton balls and cotton swabs will just have to do!


What You Need

9-12 Cotton Swabs
1 Cotton Ball
Paint
Glue
Paintbrush
 
What To Do
1. Dip the cotton ball into the paint and then glue it in the center of the page.
 
2. Glue each cotton swab onto the paper to create your flower as pictured.
 
3. Paint each cotton swab with a small brush and let dry.


Here is hoping the rain lets up and the flowers outside start to grow. We are in need of some fun outdoors and I have so many things I want to try! Some crafts are just to messy to keep indoors!


 photo FightAgainstBoredomSignature2_zpsc09e8e8d.png
 

Wednesday, May 8, 2013

Butterfly Garden

For Liv's Birthday last year she recieved a very special box with a coupon inside to send for her very own
Live Butterfly Garden . So we sent the coupon in and waited for our caterpillars to arrive. Much to my surprise they came in the mail and all survived the journey. What was nice about this project was that they came in a plastic container with all of the food they would need allowing us to just sit back and observe. Of course I did a very poor job of taking pictures throughout this process but I did get a few pictures during our send off. Now I am antsy to try something new this year. I just got a catalogue in the mail with tons of other "pets".


To check this out in more detail visit the Live Butterfly Garden website!

Monday, May 6, 2013

Toliet Paper Roll Dolls

I think I inherited my need to be crafty from my Grandma. She watches Liv and Bennett a couple of days a week and when I picked them up today we came home with our very own set of Cardboard Tube Dolls. My Grandma said that both Liv and Bennett played with them for hours today and the fun continued once we got home. I especially loved the fancy outfits that were cut out of magazines and the fact that the faces had come from our Christmas card this past year.

 
What You Need

Cardboard Tubes (Paper towel, wrapping paper, or toliet paper rolls work great)
Magazine
Photocopied Family Picture

What To Do

1. Cut the cardboard tube down to the appropriate sizes. Ours varied in size for each member of our family.

2. Cut out the faces from your photocopied picture.

3. Find outfits to cut out from a magazine for each doll. Liv said this was her favorite part of the project.

4. Glue all of your pieces together and draw on any additional pieces.

5. Have fun playing!


 photo FightAgainstBoredomSignature2_zpsc09e8e8d.png

Friday, May 3, 2013

Ants on a Log

This is an easy snack that is healthy and fun for the kids. I am lucky that Liv loves her veggies. When I suggested we make these she was really excited and was really helpful when it came to putting them together.


What You Need

Celery
Peanut Butter
Raisens

What To Do

1. Wash and cut up your celery.

2. Spread Peanut Butter onto celery.

3. Place the raisens onto the celery.

4. Tada!! Ants on a log!!


 photo FightAgainstBoredomSignature2_zpsc09e8e8d.png

Wednesday, May 1, 2013

Handprint Tulips

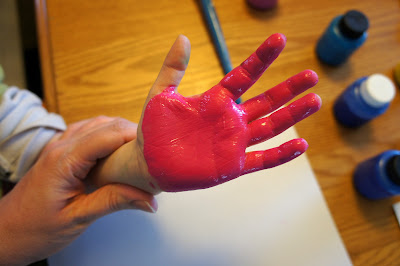
Happy May Day! One of my favorite days because it means warm weather is finally here and is going to be here for awhile (here is hoping anyways)! We had a lot of fun making these tulips in celebration. Of course Liv has fun making anything that allows her to paint her hand.

What You Need

Paint
Paintbrush
Paper
Marker/Crayons

What To Do

1. Paint the palm of your hand and all four fingers as pictured. 


2. Place hand on paper like so....


3. Add more flowers, draw on stems, and decorate however you would like.


Happy May Day!