Monday, December 24, 2012

Popsicle Stick Christmas Tree

Yesterday was a very busy day full of last minute Christmas preparations. Both kids had to make their ornaments to hand out as gifts. We also had a special dessert to make, presents to wrap, and snow to play in. We ended up skipping Liv's nap which we paid for late in the day. But I still think we had a lot of fun! I wanted to share the ornament Bennett made. I really had no idea what he could make. He is not quite 1 1/2 and only somewhat interested in crafts of this scale. However, he did have fun and I think we have a pretty darn cute ornament to hand out to family over the next two days.

What You Need

Popsicle Sticks
Paint
Paint Brush
Embellishments
Modge Podge (If you want to have the glossy look like ours and protect it for years to come)
String to hang your ornament

What To Do

1. I started by squirting a little paint onto a plate and giving Bennett a couple of sticks and a paintbrush. This later turned into me just blobbing the paint right onto his highchair and letting him go to town on all 7 of the ornaments we needed to make. Funny story Alivia was not happy with the "missed" spots. I think they add character :)


2. Once the main layer has dried you can embelish your tree. I used Bennett's finger to mostly decorate his trees. Then I punched out stars for the top and painted some of the "missed" spots brown to represent the tree truck.

3. Once this had all dried I had hubby drill small holes at the top to loop string through.

4. If you are wanting to add a protective coat over the paint this is when you do it! I used Modge Podge for the very first time and was very impressed with the results. The colors seem more vibrant now and somehow the ornament seems more impressive.

5. Once protective coat has dried thread string through hole and wahlah...new ornament :) Bennett was so proud!

Friday, December 21, 2012

The Cardboard Box

Honestly who would have thought the best part of all of these Christmas packages arriving would be the cardboard boxes that they come in?!? Last year we had a lot of fun wrapping up one of those boxes and taking pictures for our Christmas Card.


(The look on her face is a look of pure excitement....not fear...ha ha)


This years boxes have become airplanes, houses, forts, and marker/sticker fun for all. Honestly if I want the kids out of my hair while I fix dinner or try and clean up a bit all it takes is a cardboard box. I am starting to wonder if it is to late to return some of the gifts under the tree!


(Picture turned out horrible but trust me they were not into photos...they just wanted to play!)


Wednesday, December 19, 2012

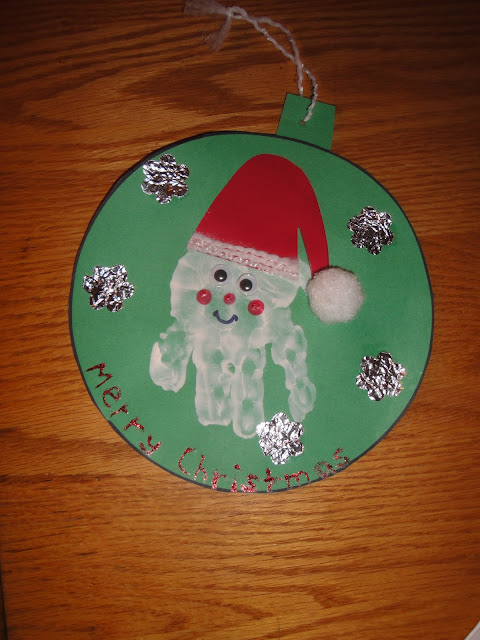
Santa Claus Handprint

I am a fulltime working mom and because I am a tax accountant I am spendng close to 60 hours a week in the office this month. So when I look in my kids bags after a long day I am always excited to find crafts that I would have loved to do with them at home. I thought this was pretty cute considering it is my sons handprint turned in to Santa Claus :)


Monday, December 10, 2012

Handprint Snowman Ornament

Every year we give a handmade ornament to family members for Christmas. This was Liv's gift last year and we had a lot of fun making these. I obviously drew on the snowmen "accessories" with a paint pen. However, if you look closely you will discover that the snow men are actually made up of Liv's handprint! 

What you need

Glass Ornaments
Ribbon to hang the ornament
Acrylic Paint/paint brush
Paintpens
Directions
1. Paint the hand of your child and have them carefully grab the ornament. You will want to be sure that the bottom of the palm is on the bottom of the ornament. You can touch up any gaps with a small brush and paint. However, I like the imperfections and kept mine as is. Also you can cover up some of the imperfections with the paint pen once you draw on the accessories.

2. Once the handprint has dried use paint pens to draw on the snowmen accessories. I did this myself once the kids were sleeping.

3. Tie a piece of ribbon to the ornament for hanging.

4. Wrap it up!

This ornament is going to be difficult to top this year. It was definitely a hit with the family and a favorite keepsake of mine as well.

Monday, December 3, 2012

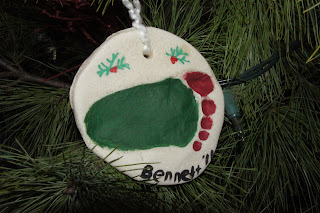
Salt Dough Ornament

Every year we like to make an ornament to hand out to family members as gifts. Because Bennett was just a baby this past year we decided his ornament would be a salt dough ornament. This ornament is super easy to make and a great keepsake for the Grandparents! You can do either a handprint or footprint. Bennett was a little so squirmy for the handprint and having learned my lesson while doing this with Liv we opted for the easy way out. Have fun!


What You Will

1/2 cup salt
1 cup flour
1/2 cup water
Rolling pin
Cookie Sheet
Toothpick
Round Cookie Cutter (A large glass will do)
Straw (To make the hole for the ribbon)
Acrylic Paints
Ribbon

Instructions

1. Preheat the oven to 250 degrees F.
2. Mix together salt, flour, and water until dough is formed.
3. Knead the dough on a floured surface until the mixture is elastic and smooth. If dough is sticky, sprinkle with flour and knead until stickiness is gone. To much flour will dry out the dough so be careful!
4. Roll the dough out to 1/4" think with a rolling pin.
5. Cut out round circles large enough for your handprint or footprint.
6. Use the straw to make a hole towards the top for the ribbon.
7. Press hand or foot into dough for imprint.
8. Place ornaments onto an ungreased cookie sheet and place into the preheated oven.
9. Bake for 2 hours.
10. Paint the ornament however you desire.
11. When dry thread the ribbon through the hole and tie in a knot.
12. Enjoy the ohs and awes on Christmas Day!