Monday, July 29, 2013

DIY - Personalized Shirt

I have made personalized shirts for many occasions. It is so easy to do and very inexpensive. Also, I am always last minute and never have time to order a personalized shirt elsewhere.

To make a personalized shirt you will just need to pick up fabric transfer paper in the printer paper isle of your local store. The fabric transfer paper comes in "dark" and "light". I recommend using the "light" if you are working with a white or even pink (in my case) shirt.

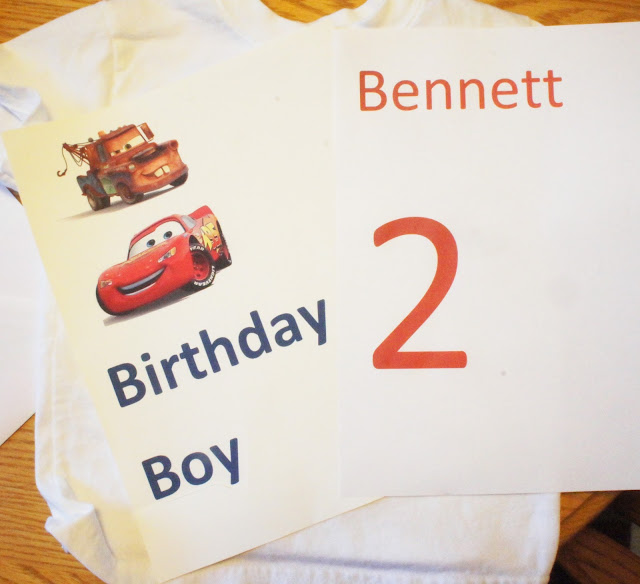
When I went to make Bennett's birthday shirt I realized I only had dark fabric transfer paper on hand (that last minute trait coming through again!). So obviously I did not use my "use light" recommendation :) However the shirt still turned out okay and Bennett loved it which was the point!

The design part of making a personalized shirt is easy. I opened a blank word document and played around with fonts for my lettering. I then searched Google Images to find the picture that I wanted. I copied the pictures and then pasted them onto my word doc.

Be sure to read the directions that come with your fabric transfer paper before printing. The "light" fabric paper needs to be printed as a mirror image. The "dark" fabric paper can be printed as normal. I have forgotten this simple trick many times in the past which can make a fun and easy project...really frustrating!!

I also like to print a couple tests on less expensive printer paper. That way I know exactly what I am wanting and I can measure it out on the shirt before I commit.

(Everything laid out prior to ironing.)

(The happy birthday boy!)


In the past I have used this method for the monthly baby picture onesies, to personalize Bennett's stuffed bear, and to mark other fun occasions.

If you have a chance I would love to hear of other ways that you may personalize things.


Saturday, July 27, 2013

Straw Necklaces

If you are looking for a way to beat boredom in the car check out my guest blog at Momaha.com today. We did this craft over a long car ride last weekend. It was a lifesaver!


I hope that everyone is having a nice weekend! It is 75 degrees today and I am loving it!!

 photo FightAgainstBoredomSignature2_zpsc09e8e8d.png

Friday, July 26, 2013

Alivia and I's Favorite List of Kid Jokes

Alivia loves a good joke. She is always asking for me to tell her one and then she will tell me one in return (most of them make absolutely no sense but I laugh anyways!).

This post is a list of the jokes that we tell on a continuous basis. Please leave a comment if you have any jokes to share. I am in need of some new ones!


Knock Knock.
Who Is There?
Boo.
Boo Who?
Don't cry it was only a joke!

Why is the number 6 afraid of the number 7?
Because 7-8-9.

Where do cows go on a Friday night?
To the moo-vies.

What does a frog robot say?
Rib-bot Rib-bot (using your robot voice).

How do you make a tissue dance?
You put a boogie in it. (kids love this one)

Knock Knock.
Who is There?
Banana.
Banana Who?
Knock Knock.
Who is There?
Banana.
Banana Who?
Knock Knock.
Who is There?
Orange.
Orange Who?
Orange you glad I didn't say Banana again?

What is black and white, black and white, black and white?
A penguin rolling down a hill.

What kind of music do rabbits listen to?
Hip-Hop

There is roadkill in the middle of the road I "1" it.
I "2" it.
I "3" it.
I "4" it.
I "5" it.
I "6" it.
I "7" it.
I "8" it. (laughs usually follow)(Or if you are wise the response would be I jumped over it and you "8" it).

What is every dog's favorite holiday?
Howl-oween

What is a potatoes least favorite day?
Fry-day

Knock Knock.
Who is there?
Mae.
Mae Who?
Mae-be you know me Mae-be you don't!

What do you call a cow that plays a violin?
A moosician.

Who did the Rabbit send his valentine too?
Somebunny Special!

Knock Knock.
Who is there?
Ahch
Ahch Who?
Bless you!

What is an aliens favorite key on a keyboard?
A spacebar.


 photo FightAgainstBoredomSignature2_zpsc09e8e8d.png

Wednesday, July 24, 2013

Bendy Dolls

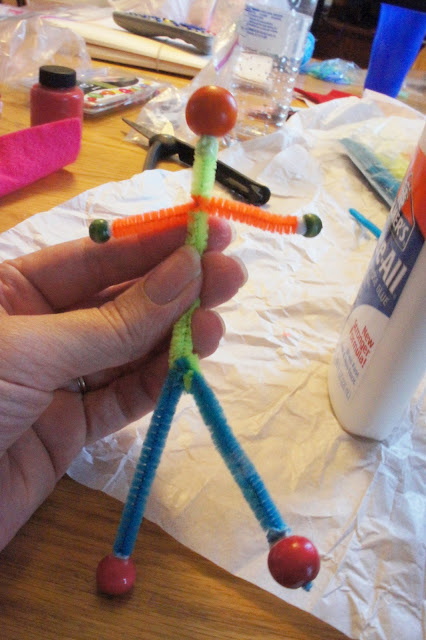
Let me introduce you to Bendy and Meeko (Liv's name choices...not mine). These dolls were unbelievably easy to make and even though the clothing has now been completely torn off (clothes on dolls are a no-no in this house apparently) the doll itself is very sturdy. We had a lot of fun with these and Liv is sleeping with her doll right now as we speak!


Materials

Pipecleaners
Wood Beads
Glue
Scissors
Paint/Paintbrush
Scrap Yarn
Felt
Stickers/glitter/jewels/etc.


1. You will first start out with 3 pipe cleaners and 5 wooden beads. The package of beads we purchased had 3 different sizes which worked great (beads were purchased from Wal-Mart for $5 and will be used again I am sure).


2. Glue the wooden bead to the top of a pipe cleaner. This is your dolls head. You will then wrap the other two pipe cleaners around the main pipe cleaner as pictured below.

3. Trim the pipe cleaners down to the appropriate sizes and cap the ends with glue and wooden beads.


4. Glue on pieces of yarn cut really short for the hair.


6. Using felt out cut out clothing for your doll. The dress was simply two triangles glued together once on the doll. The boy was a little more intensive but turned out okay. You will also want to paint or draw on a face.

7. Decorate the clothing using stickers, paint, jewels, and whatever else you can get your hands on!


Liv put on a heck of a show with these dolls once they were done and I think this may be her favorite craft to date!


 photo FightAgainstBoredomSignature2_zpsc09e8e8d.png

Monday, July 22, 2013

Family Vacation Fun

We just returned from our first family vacation and it was wonderful!

We are lucky enough to live close to an awesome state park (about 100 miles away) that is very accommodating to young families.  This state park offers cabins in a wide range of sizes. Our cabin had two separate bedrooms and a kitchen (which came in handy since a 4 and 2 year old can take the fun out of dining out).

On our vacation we hiked....


...climbed a lot of stairs to take advantage of this view...


...visited a museum...


...played in a huge jungle gym (at least 3 stories)...

...rode a pony in Liv's case and looked at a pony in Bennett's...


...enjoyed this awesome waterpark...


...went on a scavenger hunt (thanks Kiwi Crate)...


...paddled a boat...


...painted pottery...

...played miniature golf...

...and caught a fish!


We had so much fun! I used to think you had to board an airplane to have a great vacation. However, I have definitely changed my ways. There is so much to do in under a days drive and I cannot wait until next year for another adventure! Happy and safe travels to all of those heading out on their very own vacation!

 photo FightAgainstBoredomSignature2_zpsc09e8e8d.png

Wednesday, July 17, 2013

Blanket Fort = Hours of Fun!

Sometimes it is just to hot to play outside! To beat the heat we decided to take the fun indoors and build our very own fort in our living room. Once all of our kitchen chairs were in place we grabbed our biggest blankets and went to town. Both kiddos had fun and I will say there were some interesting things stashed inside when I took it down later that afternoon (baby dolls, trucks, puzzle pieces, and a long lost shoe!).


Some of the best things in life are just so simple! Happy summer everyone!


 photo FightAgainstBoredomSignature2_zpsc09e8e8d.png

Monday, July 15, 2013

Happy Birthday Bennett - Fun Farm Cake

Today is Bennett's 2nd Birthday! We are celebrating at a local state park and having lots of fun. We had his birthday party with family and friends on Saturday night and I must say he is one spoiled kiddo! He has plenty of cars and tractors to keep him occupied for a long time!
In honor of his birthday I wanted to share with you his farm themed cake. Many years ago I subscribed to Family Fun Magazine. One of the first issues had directions to make this cake. I tore the page out and filed it away for my future son. :) I was really excited to attempt this. It is definitely not picture perfect but I love it regardless!
 
 If you would like to see how to make this cake on your own (or just see what I was actually attempting to make!) click HERE !
 
I would agree that it is not perfect but it tasted great! :)

Friday, July 12, 2013

Raisen Applesauce Mini Muffins

Last summer we were on the go a lot and I wanted to pack a snack that I knew my kids would love and that had some nutritional value. I found this recipe while thumbing through an old church cookbook that was given to me by my Grandma. The original recipe was for an average size muffin, but I wanted my muffins to be bite size and decided to make them in my mini muffin pan. Each batch makes approximately 48 mini muffins so I love to freeze them and take a few out here and there as we need them. They thaw out in minutes and stay tasting fresh for a couple of months after you bake them.

Ingredients
4 c. flour
1 T. cinnamon
1 T. ground all spice
2 t. baking soda
1 c. butter
2 c. sugar
2 eggs
2 c. applesauce
2 t. vanilla
1 c. raisins
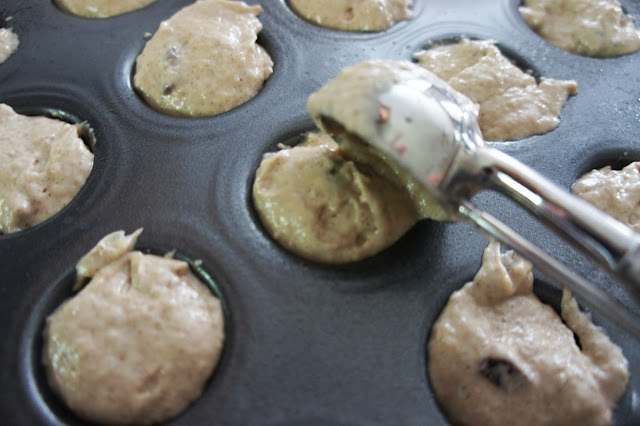
1. In bowl combine flour, cinnamon, all spice, and baking soda, set aside. In a mixing bowl cream butter & sugar. Beat in eggs, applesauce, and vanilla; stir into dry ingredients just until moistened. Fold in raisins.
2. Grease muffin pan with cooking spray and scoop muffin mix into pan. I love using my handy cookie scoop I bought from a Pampered Chef party years ago.

3. Bake at 350 degrees Fahrenheit for 10-12 minutes (20-25 minutes for average muffins). You will be able to tell that the muffins are done when you insert a toothpick and it comes out clean.
Do you have a go to snack for kids that you would like to share?? I always love new ideas!

 photo FightAgainstBoredomSignature2_zpsc09e8e8d.png

Monday, July 8, 2013

Flower Color Change Experiment

This is one of my favorite experiments. Growing up my Grandma would pick flowers from her peony bushes and let us dye them any color we chose. So keeping up with tradition I decided to show my kids just how much prettier flowers can be (I bet you didn't think that was a possibility did you?).

This is a simple experiment that really just requires patience (something my 4 year old is currently working on). Since both Liv and Bennett had to have their own flowers (per Liv's request) we used two separate vases, filled them with water, and added 6-8 drops of food coloring into each. 


The next morning we woke up too.....


Aren't they pretty! This should work with any white flower (carnations, daisies, peonies). You may also notice that the flowers are photographed in the same vase for the last couple of photos. Being the klutz that I am I accidently tipped over and broke the blue vase prior to taking a picture. Ah well! At least I did it after the flowers had changed colors instead of before!

 photo FightAgainstBoredomSignature2_zpsc09e8e8d.png

Friday, July 5, 2013

House Progress: Part 4

I hope everyone enjoyed the holiday yesterday! The 4th of July is one of my favorite holidays filled with family and friends. Our house is still coming along very slowly. Rain interupted our great progress last week and we are very anxious to get the roof put on so that the house is finally fully enclosed. It will get there I suppose!
(As things look today)
(How things looked 2 weeks ago...we are getting there!)
(Hanging out in my future office.)


(Interior of the dormers that will be open to the main living space.)

(The shingles have arrived...lets hope they get put on shortly!)


 photo FightAgainstBoredomSignature2_zpsc09e8e8d.png

Wednesday, July 3, 2013

Smore Bags

With it being the 4th of July tomorrow I thought I would share our special snack this summer. Smore bags are really easy to put together and since the kids don't get them all that often they get so excited when we have them as our special treat. My plans for these bags are to bring them out tomorrow night when we go to watch the fireworks.

To put this little bag of yumminess together you will need just 3 ingredients. Golden Grahams, Mini Marshmallows, and Chocolate chips. I put about 1/2 cup of each ingredient into a plastic baggie for each kid. I may or may not have made a couple extra for my husband and I :)


We also take these camping with us and I always make extra because everyone enjoys a smore!

I hope everyone has a happy and safe 4th of July!

 photo FightAgainstBoredomSignature2_zpsc09e8e8d.png

Monday, July 1, 2013

Necktie Onesie for the 4th of July (No Sewing Necessary)

One of my favorite things to make for a baby is a necktie onesie. Last year for the 4th of July I had to make one for Bennett to wear. He stayed nice cool and looked great too!


These neckties are so simple and no sewing is necessary. I embroidered around the necktie using the blanket stitch just to give it a finished look.

Materials

Onesie
Fabric
Wonder Under or Heat'n'Bond
Iron
Pins
Scissors
Embroidery thread and needle (optional)

Directions

1. Print off the template at the bottom of this post to use as your pattern.

2. Iron the fabric to the Wonder Under or Heat'n'Bond according to the directions. Below is a picture of the Heat'n'Bond packaging that I purchased from my local fabric store. Heat'n'Bond is much stronger than Wonder Under so I would not recommend it if using a sewing machine. In fact if you are going to do any type of sewing I would go with the Wonder Under. (My fingers were sore after ramming my embroidery needle through the Wonder Under...but it was what I had on hand so I went with it).
3. Cut the pattern out and pin it to your fabric.

4. Cut out the fabric.

5. Peel back the paper from the adhesive and iron each piece onto the onesie. I would suggest ironing the bottom piece first and the top piece last.

6. You can either call it quits or finish the edges by embroidering or sewing. There are plenty of tutorials on the web showing you how to perform several embroidery stiches. I used the blanket stitch.

7. Enjoy the many compliments you will receive on your handiwork! 


(To may need to right click on the image and save as a picture to your desktop in order to print.)

 photo FightAgainstBoredomSignature2_zpsc09e8e8d.png