Monday, April 29, 2013

Birthday Interview Printable

Last year I started a tradition with Alivia. I wrote down a set of questions and then interviewed her the night of her birthday. You can read the questions and answers from her 3rd Birthday Interview here. This year I decided to type the questions out ahead of time. It looks much nicer than my old method of writing in a notebook :)


I uploaded the above document using Google Drive. In order to print the document you may have to right click on the document, save as a picture, open your saved picture file, and print.


 photo FightAgainstBoredomSignature2_zpsc09e8e8d.png

Friday, April 26, 2013

Ice Cream Cone Cupcakes

Alivia is celebrating her 4th Birthday today! I still can't believe how fast she is growing up. I am taking the day off and we are spending the day in the city. She has requested to eat somewhere with chopsticks for lunch (PF Changs may-be?) and a friend of ours gave Liv a giftcard to Build-A-Bear (meaning we will spend our afternoon at the mall).

Due to our adventures today Alivia took her birthday treats to school yesterday. I had been wanting to make these ice cream cone cupcakes with her for a long time. My mom who is an excellent baker (a trait I did not inherit) would make these for me when I was a kid. Although our cupcakes did not turn out as fancy as hers always did we are still very proud of them!


What You Need

1 Boxed Cake Mix and the ingredients mix requires (we used a funfetti cake mix)
1 Can of Frosting (we used the funfetti vanilla frosting that came with its own sprinkles)
2 dozen ice cream cones
1 muffin pan

What To Do

1. Mix the cake mix and preheat the oven according to the package instructions.

2. Place the ice cream cones in the muffin pan as pictured.


3. Fill each ice cream cone with cake batter about 2/3 full.


4. Bake in oven according to cake mix directions. Insert a toothpick into the cupcake and if the toothpick comes out clean then your cupcakes are done.


5. Decorate your cupcakes to look like real ice cream cones. I simply spread the frosting onto each cupcake with a butter knife and threw on some sprinkles. My mom would always get out her cake decorating tips when I was a kid and make a swirling pile of frosting on top. Both taste excellent! :) 


You may be wondering how to transport these once they are finished. We simply wrapped napkins on the base of each cupcake and filled up a cake pan to carry them in. I am happy to report all arrived to daycare in one piece. Have fun!

 photo FightAgainstBoredomSignature2_zpsc09e8e8d.png

Wednesday, April 24, 2013

Monster Pant Patch

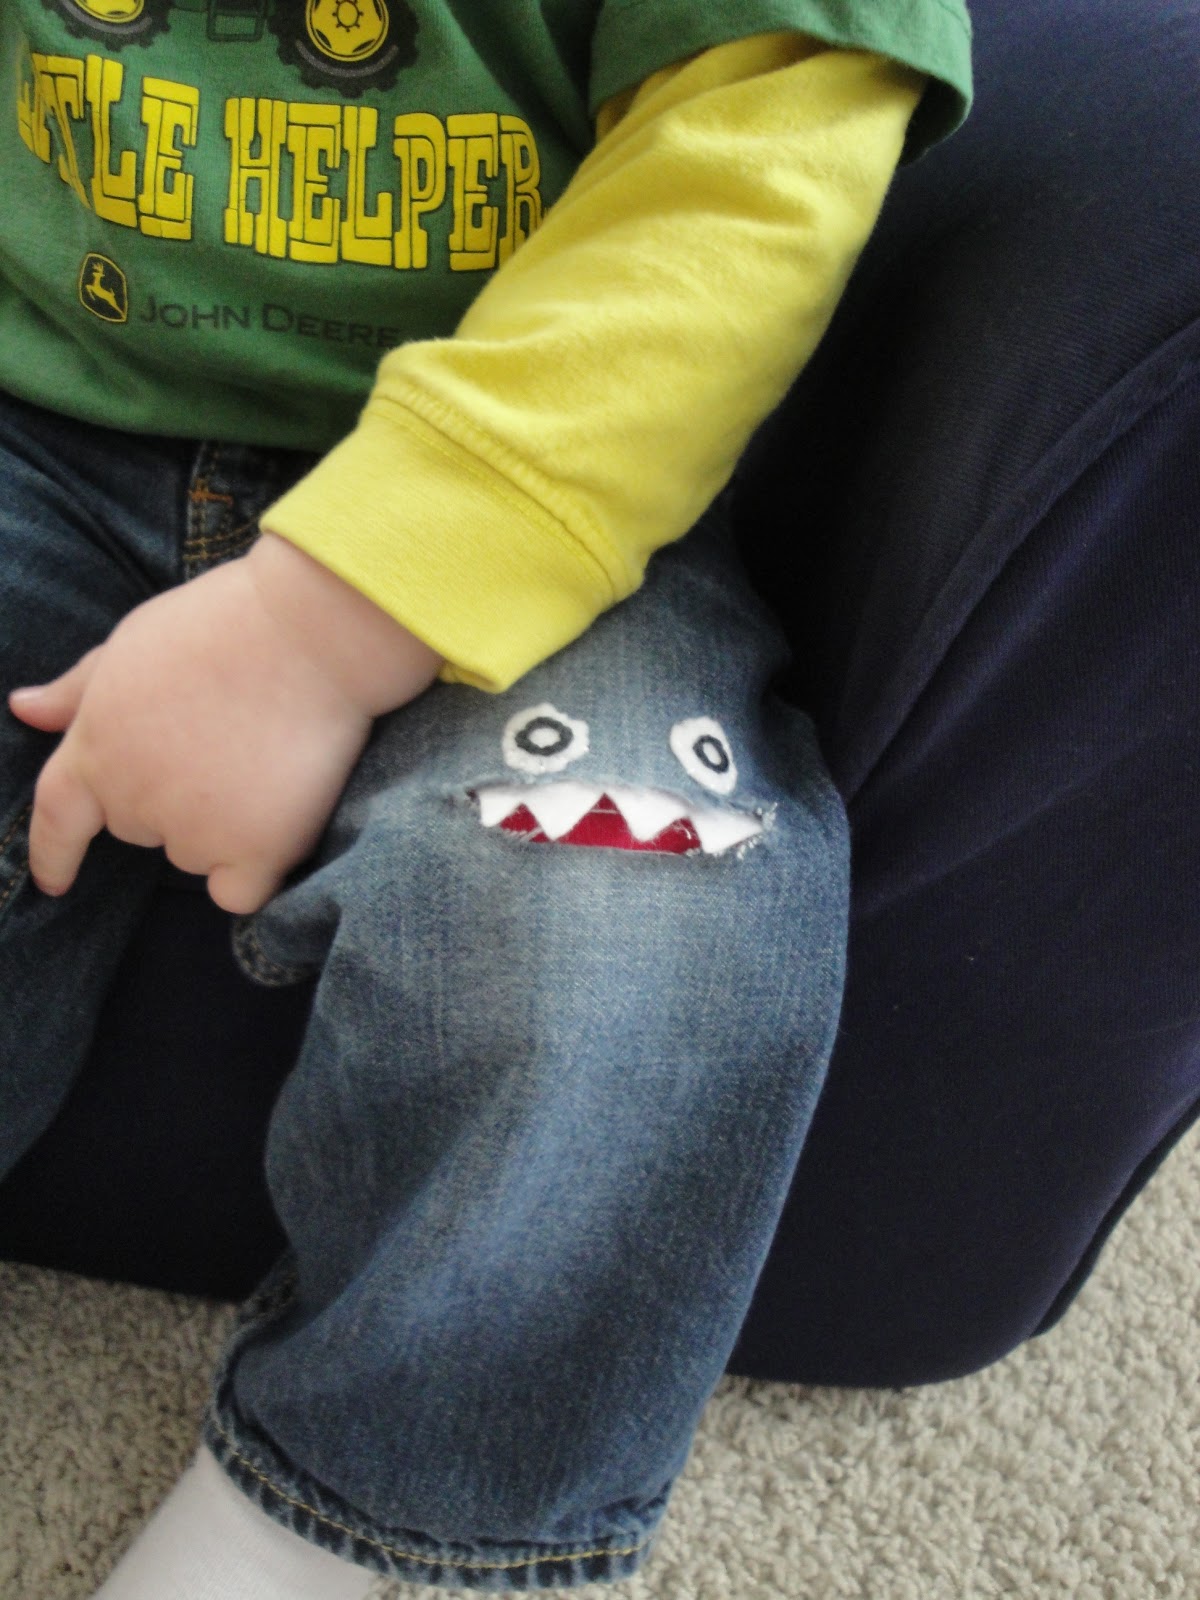
I am quickly realizing just how hard little boys can be on a pair of jeans. Bennett ended up with a hole in two pairs within a week. Because it is late in the season and I am not wanting to buy a bunch of new pants when shorts are on the horizon I decided to patch them up. This was way easier than I thought it would be and ended up so cute! Also, little skill is required. This is the first patch I have completed and I am proud to say it has been two weeks and they are still holding up!


What You Need
1 pair of Pants (with a hole of course)
1 sheet of White Felt (for the eyes)
Embroidery Thread
Needle
Heat'n'Bond
Red Cotton T-Shirt
White Cotton T-Shirt (if making teeth)


What To Do

1. Gather all of your materials. I used an old shirt of Liv's that she was growing out of for the patch. The cotton was soft and perfect for the patch. I also purchased my felt from the local craft store. Once the felt is washed it does look worn but I like the look with the torn jeans.


2. Trim the hole in the jeans. I enlarged mine just a little bit so that the red cotton was more exposed once patched.

3. Cut out a rectangle large enough to cover the patch from the red cotton t-shirt. Be sure that the rectangle is large enough that the Heat'n'Bond can adhere to the patch and denim as pictured.


3. Cut out two eyes from the felt. You can either use a fabric pen to draw on the eyes or embroider the eyes yourself. There are a lot of great tutorials online for quick and easy embroidery stiches (I used the split stitch to embroider my eyes). Also, it doesn't have to look perfect for a monster which I love!

4. Sew on the eyes like so...(I just stiched around the circumference of the circle quickly).


4. Turn your pants inside out.

5. Cut out your teeth from the cotton (I originally used felt and it did not hold up as well once washed). The pants also look adorable without the teeth if you are wanting to skip this option. I learned the hard way and soon found myself using a bit of Heat'n'Bond to affix the teeth to the pants as pictured.


5. Iron on the Heat'n'Bond frame to the red cotton and then iron onto the pants as pictured.


6. Turn the pants right side out and admire your work!


7. Try and get a nonblurry picture of your handsome toddler modeling his new denim. Ha....didn't happen! :)


 photo FightAgainstBoredomSignature2_zpsc09e8e8d.png

Monday, April 22, 2013

Paper Plate Beard

It seems like those novelty mustaches are everywhere. My kids think they are hilarious and so I thought it would be fun to make something silly of our own. These paper beards were easy to make and the kids had a blast showing them off to everyone that came to our house. Alivia even disguised her voice with a deep manly voice everytime she held it up to her face (despite the fact she had chosen to paint her beard pink).

What You Need


Paper Plate
Scissors
Paint
Popsicle Stick
Tape

Directions

1. Cut the top of the paper plate as pictured.


2. Fold the paper plate in half and cut out a mouth as pictured.


3. Paint the beard your favorite color (or colors in Liv's case).


4. Tape the popsicle stick to the back of the plate.


5. Show off your style!


Friday, April 19, 2013

Go Fly A Kite!

The weather has been unseasonably cool this spring. We are so ready to spend some time outdoors but it seems like every day is either threatened with rain or even snow. So when the sun decided to peak out from under the clouds for a couple of hours we took advantage of it and broke out the kites. It was so much fun! Alivia figured it out right away while Bennett preferred to watch.  Here is hoping it starts warming up so we can get the kites out a few more times before the heat of summer begins!


Wednesday, April 17, 2013

Wooden Heart Craft

This was a craft we made for Valentine's Day. I am a little late in posting but it still adorns our door as Alivia couldn't part with it once February was over. We picked up the wooden unpainted hearts at our local craft store for less than $1 a piece. It was an inexpensive decoration and Alivia is super proud that she made it.

What You Need

3 Unpainted Wood Hearts
Acrylic Paint
Modge Podge
Ribbon
Hot Glue Gun
Ribbon
Paint Brush

Directions

1. Paint the wooden hearts any color you would like. 

2. Once the paint has dried apply your Modge Podge. We had fun with it and made fun designs with our brush. They were difficult to photograph but turned out cute.

3. Once the Modge Podge has dried (and the kids are asleep) cut the ribbon to approximately 3 feet in length. Starting on one end glue each heart to the ribbon and space each additional heart accordingly.

4. Once all hearts have been glued loop the end of the ribbon and glue to the back of the closest wooden heart so that you can hang once dried. Cut the excess ribbon.


 photo FightAgainstBoredomSignature2_zpsc09e8e8d.png

Monday, April 15, 2013

Happy Tax Day!

Well I wanted to post a flashy picture in this post but everything I have found in relation to taxes was not so happy (hmmm....I wonder why?). For the past few months I have been locked up in an office during the day and working at the kitchen table once the kids were in bed at night. So today I am celebrating....and sleeping in tomorrow :) Happy Tax Day! I am looking forward to 30 hour work weeks and tons of summer fun with the kiddos!
 photo FightAgainstBoredomSignature2_zpsc09e8e8d.png

Friday, April 12, 2013

Something Fishy!

As a special surprise we decided to take Liv to PetSmart so that she could pick out her very own fish. Of course in my mind I pictured a couple of goldfish, a fun fish tank, and some fancy decor to place inside. Liv on the other hand had another idea and fell in love with this guy. Although looking at the picture now I guess he is fairly cute. I was just surprised when she bypassed all of the blue, red, and even purple beta fish for this dull pink one. What she will do in the name of her favorite color!

(Introducing Millie!)

(It's Love!)

 photo FightAgainstBoredomSignature2_zpsc09e8e8d.png

Wednesday, April 10, 2013

When All Else Fails

When all else fails at keeping them busy....give them a broom (or in our case a swiffer sweeper)!


See we all benefit from this project! I am always a thinkin'!

 photo FightAgainstBoredomSignature2_zpsc09e8e8d.png

Tuesday, April 9, 2013

Win Your Kid's Dream Craft Room!

I had to share this with everyone. I have been wanting the craft table from Pottery Barn for ages. It would be great if I could win it and even better fully stocked with craft supplies! Good luck to all that enter!


Enter to win $750 in prizes from Pottery Barn Kids + Kiwi Crate! ››

Kiwi Crate Giveaway
 photo FightAgainstBoredomSignature2_zpsc09e8e8d.png

Monday, April 8, 2013

Molded Crayons

I had been wanting to make these since our box of crayons melted in the car during our vacation last summer. Add Bennett's ability to break every crayon he touches to the melted crayon mix and we had a pretty good stash of "junk" crayons. Then add a super great deal on Amazon for this Silicone Baking Pan and we were in business. This project was a lot messier than I had intended it to be but the end result was perfect! Also, Bennett has a much harder time breaking these crayons so we all win!


What You Need

Crayons
Silicone Baking Pan

What To Do
1) Peel and break the crayons into small pieces. My husband decided to use a kitchen knife which allowed us to get much smaller pieces than breaking.


2) Sort out your crayons and fill each mold with the colors you would like.

3) Preheat oven to 300 degrees and bake for 15 minutes or until crayons are liquefied.
4) Let cool for about 20 minutes or until the crayon is solid. Gently remove the crayon from the mold and let cool completely.
5) Have fun!!!


 photo FightAgainstBoredomSignature2_zpsc09e8e8d.png

Friday, April 5, 2013

First Ice Cream Cone of the Season

After a long week and great reports from the teachers at daycare we took a detour for ice cream. Our local ice cream parlor just opened up for the season and the weather was finally decent enough for a special treat.


 photo FightAgainstBoredomSignature2_zpsc09e8e8d.png

Our Forever Home


Boredom is definititely not it the cards in our future. After years of paying off debt, saving our money, and plotting our plan of attack we finally broke ground for our forever home. I am very excited to watch things come together and to use a little elbow grease of my own. We still have a very long way to go but I will keep you posted......


 photo FightAgainstBoredomSignature2_zpsc09e8e8d.png

Wednesday, April 3, 2013

Thinking Out Loud

Can anyone tell me what comes after you count to three? I am scared of the day my kiddos realize that I have got nothing. Currently the method works like a charm. You should have seen Bennett scurry up the stairs into bed last night once I got to two. It was very difficult to keep a straight face!
 photo FightAgainstBoredomSignature2_zpsc09e8e8d.png

Monday, April 1, 2013

Plastic Easter Egg Snake

 I hope that everyone had a wonderful Easter. Our day was filled with family and a lot of fun. Prior to heading to our Grandma's for lunch I had to devise a plan to keep the kiddos busy while I made a casserole. Bennett colored and Alivia gathered all of the plastic Easter eggs the Easter Bunny had hidden for them to find that morning. This project was super easy and the end result was really cute. Also, you should be able to find some decent deals at the store if you don't already have a plastic Easter egg stash at home.

What You Need

2 Dozen Plastic Easter Eggs
2 Pipecleaners
Googly Eyes
Felt
Glue

What To Do

1) Thred a pipecleaner through the plastic egg as pictured and twist the two ends together to secure the pipecleaner. The eggs we purchased had two small holes at the end that worked perfect for this.


 2) To seal the end thred the other half of the egg onto the pipecleaner and shut. When finished this will be the snakes head so choose your colors wisely.

3) Now thread the remaining plastic eggs onto the pipecleaner. When you run out of pipcleaner twist on another pipecleaner as pictured.

  
4) Once your snake is the desired length thread the pipecleaner back into the plastic egg.
 
 5) Cut a piece of felt about two inches long and 1/4" wide. Snip the end to complete the snake tongue. Glue the tongue as pictured and then glue on the googly eyes.


6) Have fun with your new pet snake!


No eggs were harmed in the making of this project. Once the kids are done playing simply unthred the eggs from the pipecleaner, peel off the googly guys, and wash the eggs in warm soapy water. 


 photo FightAgainstBoredomSignature2_zpsc09e8e8d.png